A well-tuned aftermarket system — even a modest one — makes the gap between factory audio and its potential obvious almost immediately. A simple speaker upgrade, a head unit with a better DAC, and a modest powered subwoofer can cost as little as $550 installed, and the difference from stock is rarely subtle. It's the difference between hearing music at a distance and hearing it in the room with you.
Factory car audio is designed to a budget, not to a standard. Manufacturers spend between $3 and $18 per speaker at wholesale costs across most mainstream vehicles. These speakers use paper or low-grade polypropylene cones, foam surrounds that degrade within 3 to 5 years in heat, and magnet structures so undersized they literally cannot move enough air to produce meaningful bass. The head units are similarly optimized for cost — they use DACs (digital-to-analog converters) that introduce measurable distortion at moderate volume levels, and their amplifier sections run out of clean headroom at volumes that a properly designed system would consider moderate.
The good news: improving on factory audio doesn't require an expensive professional installation or audiophile-grade equipment. The most impactful upgrades follow a clear progression, each step delivering noticeable improvement, and any of them can be done independently. Here's the complete guide.
The Right Strategy: Upgrade in the Right Order
The sequence of audio upgrades matters as much as the upgrades themselves. Many buyers make the mistake of adding a subwoofer first because bass improvement is obvious and visceral, then discover that the remaining midrange and treble from inadequate speakers sound worse with the frequency imbalance the sub creates. The correct sequence maximizes the return from each step and avoids the tuning problems that come from building on a weak foundation.
Correct upgrade order: speakers first (front doors, then rear if you care about rear fill), then head unit if needed or wanted, then amplifier and subwoofer for the final level of system completeness. Each step is independently satisfying and doesn't require completing subsequent steps to sound good. You can stop at any point in the sequence and have a meaningfully better system than factory.
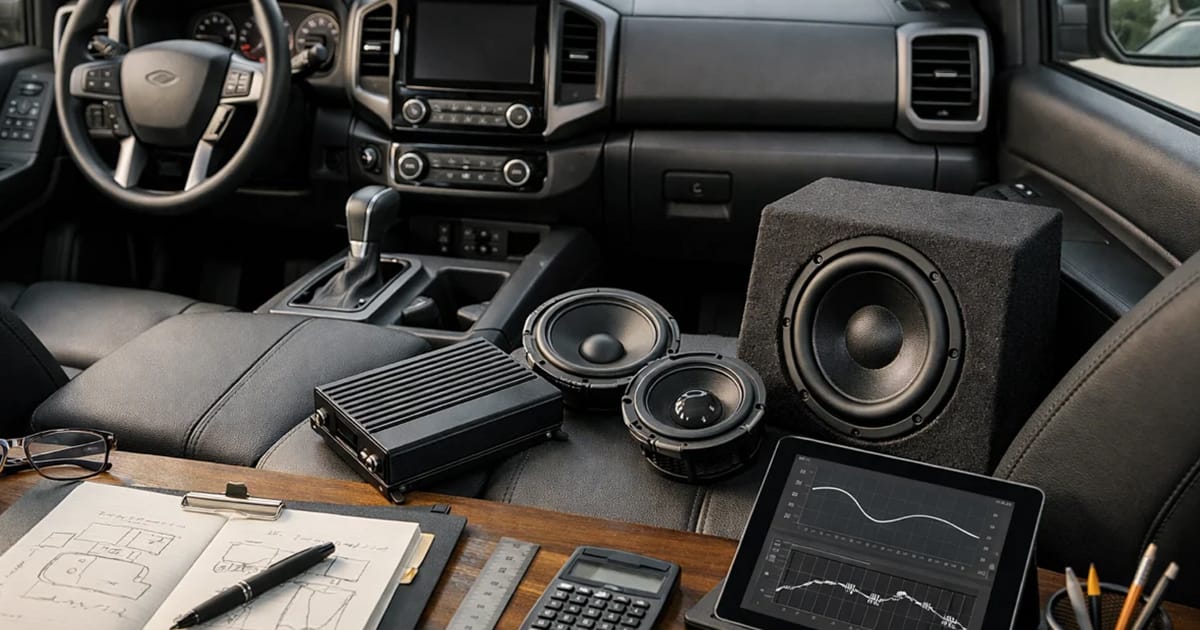
Speaker Upgrade: The Upgrade With the Highest Return
The front door speakers — the ones closest to the driver and primary passenger — account for approximately 70 to 80% of the perceived audio quality in a car. They handle the midrange and treble frequencies that carry vocal clarity, instrumental detail, and the qualities that separate an engaging listening experience from an indifferent one. Upgrading these two speakers before anything else delivers the most dramatic improvement per dollar of any audio modification.
On most factory speaker installations, the front door speaker is a 6.5-inch or 6x9-inch coaxial driver mounted in a pre-cut opening in the door skin. The factory wiring connects to the factory head unit's amplifier section, which in most vehicles delivers 12 to 18 watts of real power (versus the "peak power" marketing claims of 40 to 50 watts that are measured in conditions that never occur during actual music playback). This is important context: a quality aftermarket speaker running on factory power — without an external amplifier — still sounds dramatically better than the factory speaker, because the improvement comes primarily from better cone materials, better magnet structures, and better crossover networks that more cleanly separate frequencies, not from more power.
The installation process for front door speakers: remove the door panel (typically 2 to 4 screws in the handle recess and map pockets, plus 8 to 15 snap-in plastic clips around the perimeter), disconnect the speaker wiring harness, remove the factory speaker (usually 3 to 4 screws), and install the new speaker using a vehicle-specific adapter harness (from Metra Industries or PAC Audio, approximately $12 to $25, available for every common vehicle) and adapter mounting bracket if needed. Reconnect the harness, test the speaker before reinstalling the door panel, reinstall the panel. Total time for an experienced first-timer: 60 to 90 minutes per door. Second time: 30 to 40 minutes per door.
One detail that separates a professional-sounding installation from an amateur one: sound deadening on the inner door skin. Factory door panels are thin stamped steel with minimal damping material, which means they vibrate in sympathy with bass frequencies and create resonances that muddy the sound. Applying a self-adhesive damping material (Dynamat Xtreme, Second Skin Audio Damplifier Pro, or Noico 80mil) to the inner door skin behind the speaker significantly reduces these resonances and tightens the perceived bass from the door speakers noticeably. This step adds $40 to $80 in materials and 30 additional minutes per door but makes a meaningful audible difference, particularly on lighter-gauge vehicle doors like those on compact cars and small SUVs.
Choosing the Right Speakers for Your Vehicle
Before purchasing any replacement speaker, confirm three things: the factory speaker size (6.5-inch, 6x9-inch, 5.25-inch, etc. — measured across the cone diameter), the mounting depth available behind the speaker baffle (critical, often overlooked — some factory locations have very limited depth and a deep-basket aftermarket speaker physically won't fit), and whether your vehicle has a factory amplifier in the audio system (common in vehicles with "premium sound" packages from manufacturers). The Crutchfield website's vehicle-specific speaker search is the most reliable source for all three pieces of information — enter your year, make, and model and it returns exact specifications, compatible products, and often wiring adapter requirements.
The mounting depth issue specifically deserves attention because it creates incompatibility that most product listings don't prominently flag. A Focal component speaker with a 3.2-inch mounting depth simply will not fit in a location with 2.8 inches of available space regardless of its cone diameter. Measure your available depth before purchasing, or verify compatibility through Crutchfield's fit guide, which accounts for this dimension specifically.
If your vehicle has a factory amp (common in packages like the Honda Bose system, Toyota JBL package, Ford 8-speaker system, etc.), you need speakers with higher sensitivity ratings — typically 90 dB or higher — because factory amps often output less power than they're rated and also output at impedances that differ from standard aftermarket speakers. Alternatively, bypassing the factory amp entirely by connecting aftermarket speakers directly to the head unit output (bypassing the amp in the signal chain) is often the better solution and is covered in resources specific to your vehicle model on forums and communities like car-stereo.net and the r/CarAV subreddit.
Component vs Coaxial Speakers: The Real Trade-Off
Coaxial speakers (also called two-way or three-way speakers) mount the tweeter on a small pole at the center of the woofer cone, allowing the entire speaker assembly to fit in the factory opening. They're the simpler, less expensive option and the right choice for most casual listeners who want clear improvement without complex installation. A quality coaxial from Focal, Pioneer Alpha, or JL Audio in the $60 to $120 per pair range produces excellent sound that embarrasses factory speakers without requiring any additional mounting fabrication.
Component speaker systems separate the woofer and tweeter into independent units, with a crossover network that sends the appropriate frequencies to each driver. The tweeter is mounted separately — in the A-pillar, the sail panel on the front window corner, or a surface-mount location on the dash — which allows it to be positioned closer to ear level than the woofer in the door and creates a more three-dimensional soundstage. The improvement in soundstage depth and imaging versus coaxials is real and noticeable to most listeners; the trade-off is more complex installation (two mounting locations per speaker, external crossover network to mount somewhere in the door) and higher cost. Component sets start around $100 to $120 for entry-level quality and run to $400 to $800 for audiophile-grade sets.
For most drivers doing their first audio upgrade: start with coaxials. They're simpler to install, cost less, and deliver most of the sonic improvement available from a speaker swap. If you find yourself wanting more after living with coaxials for 6 months — specifically, wanting a wider soundstage and better imaging — step up to components on your next upgrade cycle.
Speaker Brands Worth Trusting in 2026
The car audio speaker market contains a wide range of quality levels with overlapping price points, making brand reputation a useful guide. The brands that consistently produce what they claim and are worth the premium they charge:
Focal (French): widely considered the benchmark for midrange and high-frequency reproduction at accessible prices. The Focal IS165 component set at approximately $150 is a consistent starting recommendation from car audio professionals — detailed treble without harshness, midrange that handles vocals with exceptional clarity, and build quality that lasts a decade. More expensive Focal sets (Performance, Expert) offer diminishing but genuine improvements that matter more to serious listeners. The accessible K2P series ($600 to $1,000 per set) is competitive with anything at twice the price from lesser brands.
JL Audio (American): the dominant brand in subwoofers and a strong performer in door speakers. JL's C2 Evolution series ($80 to $120 per pair for coaxials, $150 to $200 for components) offers excellent build quality and a warm, musical tonal balance that works well with most factory head units without requiring equalization. JL's customer service and dealer support network are exceptional by industry standards.
Alpine: one of the original Japanese car audio brands with a long history of solid OEM and aftermarket quality. The R-Series (R-S65.2) component sets at approximately $100 to $130 are well-regarded for their sensitivity ratings that work well with factory amplification and their durability in temperature-extreme environments. Alpine's Type-R subwoofers are among the most trusted in the mid-price segment.
Pioneer Alpha (not Pioneer in general, specifically the Alpha series): Pioneer's mainstream speaker lineup is mediocre for the money. The Alpha series (TS-A1680F at $45 to $55, the A-Series generally) uses better magnet structures and cone materials than the standard lineup and represents the best value in budget speakers — not audiophile quality, but honest improvement over factory at an honest price. For buyers who want good results from $50, this is the recommendation.
Avoid: Kenwood's speakers (the head units are good; the speakers are average for the money), Kicker in the entry-level segment (the performance flagship line is good; the lower tiers aren't), and anything from brands that appear primarily as Amazon Basics alternatives with no established reputation.
Head Unit Replacement: When It Makes Sense
A quality aftermarket head unit improves audio quality through three mechanisms: better DAC (digital-to-analog converter) quality that reduces distortion during digital playback, more amplifier power output to drive speakers to cleaner higher volumes, and better equalization and signal processing tools that let you tune the system for your vehicle's acoustic characteristics. The improvement in perceived audio quality from a head unit upgrade is real but less dramatic than a speaker upgrade — it's the difference between 70% and 85% of the system's potential being realized, rather than the 40% to 70% jump that speakers represent.
The practical value of a head unit upgrade has also changed significantly with the near-universal availability of wireless Apple CarPlay and Android Auto. Most drivers' primary audio source is their phone, streaming through CarPlay or Android Auto. Factory head units that support wireless CarPlay (the significant upgrade from wired CarPlay) are becoming standard on 2023 and newer vehicles, which reduces the functionality gap that previously made head unit replacement very attractive. If your factory head unit already has wireless CarPlay and reasonable audio output, the incremental improvement from an aftermarket head unit may not justify the cost and installation complexity.
Head unit replacement is most valuable when: your factory head unit lacks CarPlay or Android Auto entirely (common on 2018 and older vehicles); your factory head unit is specifically poor quality (audible distortion at moderate volumes, buzzing, or interference); or you want the equalization and signal processing tools that quality aftermarket units provide to fully tune your upgraded speaker system.
Head Unit in Modern Vehicles: The Important Complication
On vehicles from approximately 2019 onward, many manufacturers have integrated the infotainment system with climate control, backup camera, vehicle settings, and driving aids in ways that make simple head unit replacement impossible without additional interface modules. Replacing the head unit in a 2022 Toyota RAV4, for example, requires either accepting the loss of RAV4's climate display integration or purchasing aftermarket interface modules (from Axxess, PAC Audio, or iDatalink) that restore these functions at a cost of $80 to $200 in additional hardware.
Before purchasing any head unit for a 2019 or newer vehicle, verify compatibility specifically on Crutchfield's compatibility page or the Metra Online compatibility database. These databases identify which functions are retained and which require interface modules, the specific modules required, and the total cost of the complete installation. This research prevents the frustrating situation of installing a head unit and discovering that the climate display or backup camera no longer works.
Subwoofers: Adding What Speakers Can't Deliver
Human hearing perceives bass frequencies (below approximately 80 Hz) through the entire body, not just the ears. The resonance in your chest when a kick drum hits, the physical sensation of a bass note in an acoustic space — these are not audio illusions. They're real physical phenomena that require moving significant volumes of air. Standard 6.5-inch door speakers, regardless of quality, physically cannot move enough air to reproduce these frequencies at listenable levels. A subwoofer is not a luxury addition for bass-heads; it's the component that allows your audio system to faithfully reproduce the full frequency content of music as recorded.
A well-integrated subwoofer — crossed over at the appropriate frequency (typically 80 Hz with a steep 24 dB/octave slope), calibrated to complement rather than overwhelm the door speakers, and positioned to minimize reflections off the trunk walls — is not about thumping bass. It's about restoration of the octave of musical information below 80 Hz that factory systems simply don't reproduce. Classical music, acoustic jazz, blues, and rock with piano or organ all contain substantial energy below 80 Hz. A system without a subwoofer sounds thin and incomplete on this music in ways that listeners attribute to "the car just doesn't sound good" without identifying the specific frequency absence as the cause.
Powered Subwoofer Enclosures: The Best Starting Point
For buyers who want subwoofer bass without custom installation complexity, powered subwoofer enclosures are the recommendation. These units combine the subwoofer driver, amplifier, and enclosure in a single pre-built package that installs in 30 to 60 minutes by connecting high-level inputs from the head unit or speaker wiring and plugging in to a 12V power source.
The JL Audio CP108LG-W3v3 (approximately $350) is consistently the benchmark recommendation in this category. It contains an 8-inch W3v3 subwoofer driver in a sealed enclosure with a built-in amplifier, produces accurate, well-defined bass rather than the one-note boom of lesser powered subs, and fits in most trunk areas without excessive intrusion into cargo space. The W3v3 driver is JL Audio's entry into their serious subwoofer lineup and represents genuine build quality — cast aluminum basket, lead-tinned voice coil wire, Santoprene surround — at a price point that competes with midrange offerings from other brands.
The Rockford Fosgate PS-8 Punch (approximately $220) is the value alternative — a similar self-contained powered subwoofer enclosure with slightly less output and slightly less precise tuning than the JL, but adequate for casual listeners at a significantly lower price. For buyers who want to add bass without spending $350: the PS-8 is a reasonable gateway to understanding whether you want to invest more.
Custom Subwoofer Builds: For Maximum Control
A custom subwoofer build — a separate subwoofer driver, external mono amplifier, and custom-built enclosure — allows much greater control over bass quality, quantity, and character than any powered enclosure. The trade-off is cost, installation complexity, and the need to design the enclosure correctly for the specific driver being used.
The components for a quality custom build: a 10 or 12-inch subwoofer driver from JL Audio's W3 or W6 series ($150 to $400), a mono Class D amplifier from Alpine (MRV-M500) or JL Audio (JX500/1D) in the 300 to 500 watt range ($150 to $250), a ported or sealed enclosure either purchased pre-built or custom-fabricated to the driver's T/S (Thiele/Small) parameters ($80 to $200 for a quality enclosure), and installation hardware including RCA interconnects, speaker wire, power and ground cables, and an inline fuse holder ($60 to $100). Total parts cost for a quality custom build: $440 to $950.
Amplifier installation is the part of this build that most warrants professional assistance if you're doing it for the first time. Running the main power cable from the battery through the firewall to the trunk, sizing the fuse correctly, and grounding the amplifier to bare metal properly are not complex tasks for someone who has done them before, but doing them incorrectly creates fire risk (undersized fuse or improperly routed cable) or ground loop noise (improper grounding). A professional installer charges $100 to $200 for amplifier installation — money worth spending on the first build before you understand the process well enough to DIY it safely on subsequent vehicles.
Budget Tiers That Deliver Real Results
| Budget | Recommended Upgrades | Expected Result |
|---|---|---|
| $80 to $150 | Pioneer Alpha front coaxials + sound deadening on doors | Clear improvement in midrange and treble clarity. Bass still limited by speaker size. |
| $150 to $300 | Focal IS165 or JL C2 component set front + Pioneer Alpha rear coaxials | Significant improvement in soundstage and clarity. Better imaging than factory in any configuration. |
| $300 to $600 | Component speakers + aftermarket head unit (Pioneer DMH-W4660NEX) | Full frequency upgrade from the head unit's better DAC and power plus speaker quality improvement. |
| $600 to $1,000 | Component speakers + head unit + JL CP108LG powered sub | Complete system with proper bass extension. Music sounds as recorded across the full frequency range. |
| $1,000 to $2,000 | High-end components + head unit + custom sub + amplifier | Audiophile-quality car audio. The ceiling of what most vehicles can support without acoustic treatment. |
DIY Installation: What's Realistic at Each Stage
Speaker replacement is the most accessible DIY stage — anyone who can use a screwdriver, follow specific YouTube guides for their vehicle, and spend 2 to 4 hours on a Saturday can complete a front speaker installation correctly on the first attempt. The main risk is accidentally breaking plastic door panel clips, which snap back in most cases but occasionally break and require $2 to $8 replacement clips from the dealer. Not a serious risk, and not a reason to avoid the DIY approach.
Head unit installation becomes more complex on modern vehicles with integration requirements, but remains DIY-viable for most pre-2022 vehicles using a Crutchfield-specified wiring harness adapter and dash kit. Crutchfield's phone and chat support (free with purchase) is excellent and has walked many first-time installers through specific problems in real time. For vehicles requiring integration modules (2019+), add 1 to 2 additional hours of installation complexity and the risk of missing a specific connection — the manual troubleshooting guides are good but imperfect.
Amplifier and subwoofer wiring is the stage where professional installation most clearly earns its fee for first-time builders. The power cable routing, fusing, and grounding have specific requirements that exist for safety reasons, not just aesthetics. If you have any uncertainty about electrical work, pay the $100 to $200 for professional amplifier installation. You learn the process watching it done, which prepares you to DIY it on the next vehicle.
Common Mistakes That Waste Money
The most expensive common mistake is buying a subwoofer as the first audio upgrade. Without improved door speakers, adding bass creates a frequency imbalance where the low end is improved but the midrange remains the factory quality that wasn't good enough to begin with. The result sounds worse in a specific way — more bass than your speakers can complement — and buyers often blame the subwoofer for a problem that's actually the door speakers. Speakers first, sub second, always.
The second expensive mistake is buying a head unit that doesn't integrate with the vehicle's factory features without researching the integration requirements first. The frustration of losing backup camera functionality or climate display integration is significant enough that some buyers remove the aftermarket head unit and return to factory — wasting the installation labor and the hardware cost. Research integration requirements before purchasing anything.
The third mistake is applying the "more power is better" logic to subwoofer amplifiers. A 1,000-watt amplifier driving a subwoofer rated for 500 watts damages the subwoofer when the amp is pushed. A properly sized amplifier — 75 to 150% of the subwoofer's rated continuous power handling — driven to 80% of its output is both louder and more reliable than an oversized amp running at 30% output.
The one change with the most impact
If you do nothing else: replace your front door speakers with a quality set of coaxials in the $60 to $120 range. This single change delivers roughly 60% of the sonic improvement achievable at any budget and costs less than a dinner out. The difference between factory speakers and quality aftermarket coaxials is not subtle. If you try it and don't notice a meaningful improvement, your audio expectations are higher than this budget tier can address and you should plan a more comprehensive upgrade from the start.