Most drivers know their oil needs changing. A good number know their brake pads wear out. Almost nobody thinks about their coolant until the temperature gauge starts creeping toward red on a hot day in traffic, at which point the maintenance task they skipped for three years becomes a $1,500 repair instead of a $30 DIY job.
Coolant does three things that nothing else in your car can do. It prevents your engine from overheating by carrying heat from the block to the radiator. It prevents freezing in cold climates by lowering the fluid's freezing point. And it protects every metal surface it touches from corrosion, including the radiator, heater core, water pump, and engine block passages. When coolant degrades, that last function fails first. The fluid stays wet and circulating, so the engine does not immediately overheat, but corrosion begins accumulating silently in components that cost hundreds or thousands of dollars to replace.
A coolant flush costs $20 to $40 in parts if you do it yourself, or $100 to $200 at an independent shop. The components it protects cost $500 to $2,500 to replace when they fail from preventable corrosion. The math on doing this on schedule is not complicated.
What Coolant Actually Does Inside Your Engine
Your engine operates at 195 to 220 degrees Fahrenheit under normal conditions. That heat is a byproduct of combustion, and if it were allowed to accumulate, the engine would begin warping critical components within minutes of starting. The cooling system is the reason your engine can run continuously at those temperatures without damage.
Coolant circulates through passages in the engine block, picking up heat from the metal surfaces. It then travels to the radiator, where airflow pulls that heat out of the fluid before it returns to the engine to repeat the cycle. The water pump keeps the fluid moving; the thermostat regulates temperature by controlling when the coolant begins flowing to the radiator.
The antifreeze chemistry in modern coolants does more than prevent freezing. The corrosion inhibitor package protects every metal and rubber surface the fluid contacts. Without those inhibitors, the slightly acidic water chemistry would begin attacking aluminum, copper, and rubber components from the inside. The inhibitors deplete over time and with heat cycling, which is why coolant has a service life rather than lasting indefinitely.
A simple drain-and-refill removes roughly 60 to 70 percent of the old fluid, with the remainder trapped in the engine block passages, heater core, and hoses. A proper flush circulates fresh water or a flushing agent through the entire system to remove the old fluid more completely, then refills with fresh coolant. The distinction matters for vehicles with contaminated or acidic coolant, where partial replacement leaves corrosion-promoting fluid in the system.
The Three Types of Coolant and Why Mixing Them Is a Serious Problem
This is the section most guides rush past, and skipping it causes real damage to engines. There are three main coolant chemistries in use today, and they are not compatible with each other. Mixing them creates a chemical reaction that produces a gel-like sludge that blocks coolant passages and destroys water pump seals.
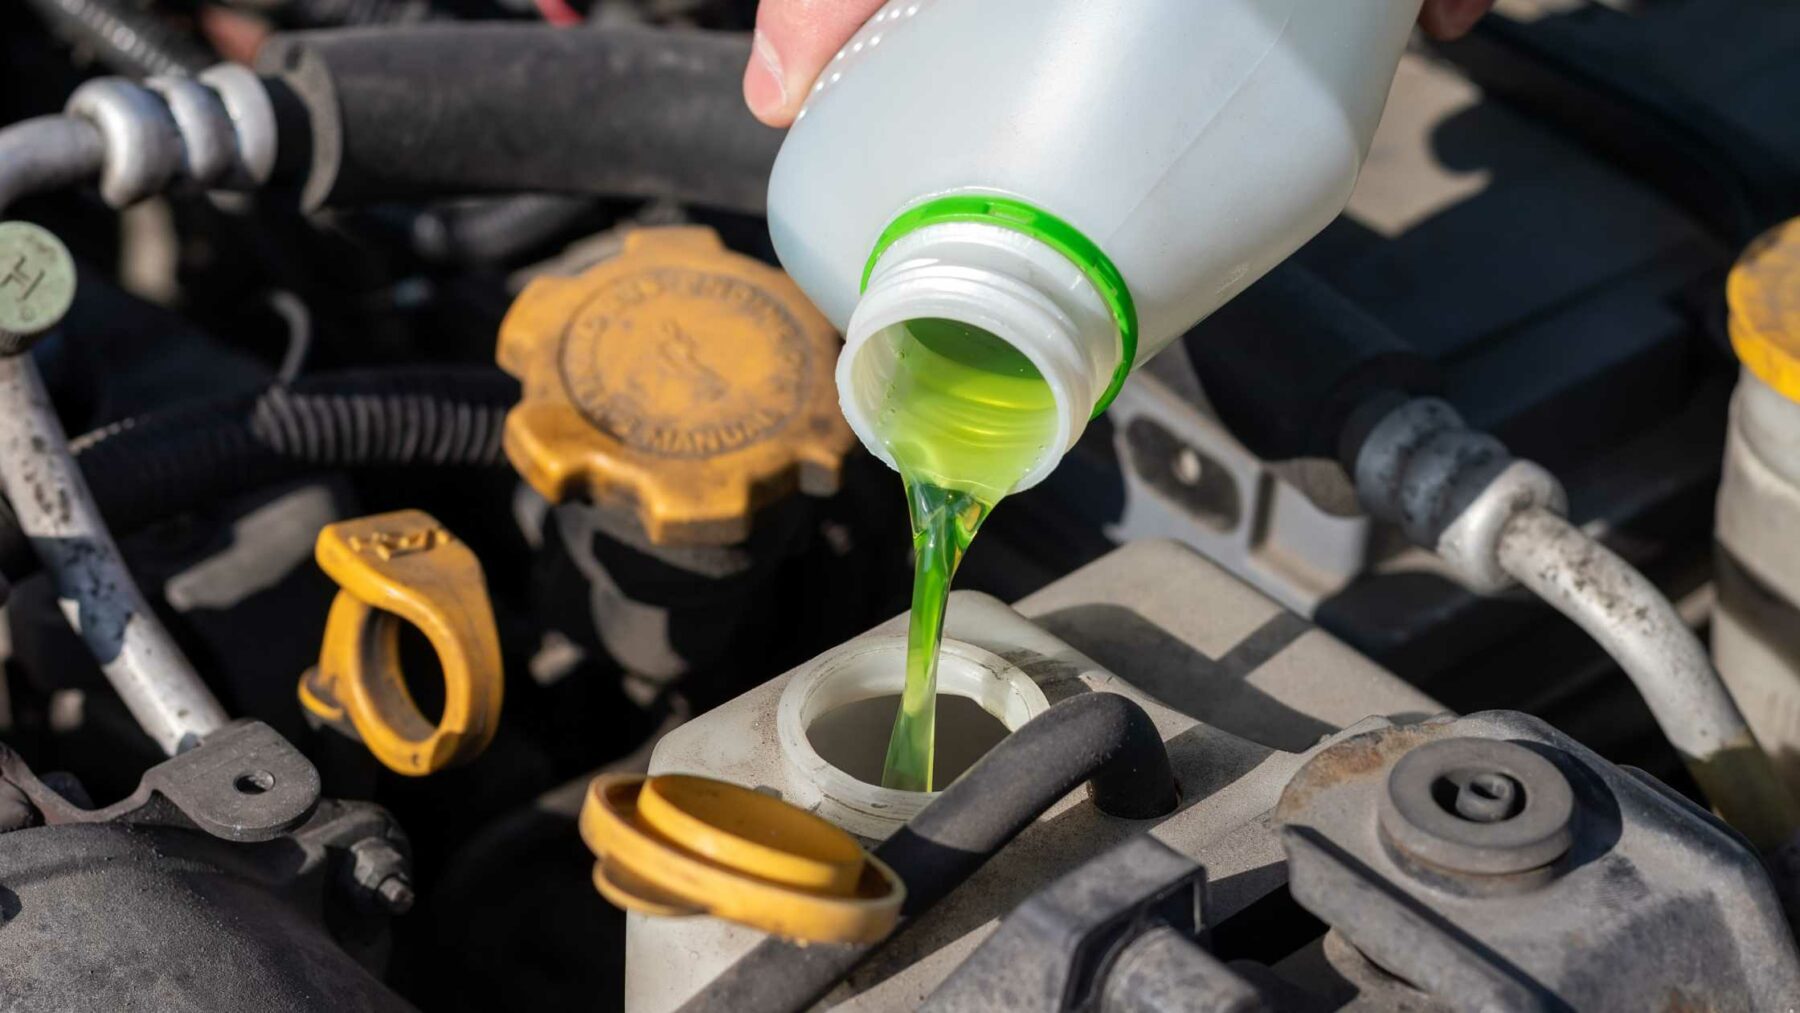
IAT (Inorganic Additive Technology) : Traditional Green
The traditional green coolant. Uses silicates and phosphates as corrosion inhibitors. Found in most vehicles manufactured before the late 1990s and some current vehicles from Ford, Chrysler, and certain Asian manufacturers. Service life is approximately two years or 30,000 miles because silicates deplete quickly. This is the coolant that created the "flush every two years" recommendation that many older service schedules still follow. If your vehicle specifies green coolant, this is what you need.
OAT (Organic Acid Technology) : Orange, Red, or Pink
Extended-life coolant with a longer service interval, typically five years or 100,000 to 150,000 miles. General Motors' Dex-Cool is the most widely known OAT coolant, colored orange. Toyota's Super Long Life Coolant is pink. Many other manufacturers use OAT-based formulations in various colors. OAT coolants use organic acids rather than silicates for corrosion protection, which depletes more slowly. The extended service life is real, not marketing.
HOAT (Hybrid Organic Acid Technology) : Yellow, Turquoise, or Blue
A blended formula combining silicate and organic acid corrosion inhibitors. Used widely by European manufacturers including BMW, Mercedes, Volkswagen, and Audi, as well as some Chrysler and Ford applications. Service life falls between IAT and OAT, typically three to five years or 50,000 miles, depending on the specific formulation. VW's G12, G13, and G12++ coolants fall into this category, each with slightly different chemistry and compatibility requirements.
The rule is absolute: check your owner's manual or the label on your coolant reservoir cap and use exactly the coolant type specified. Color is not a reliable indicator because manufacturers use different colors for the same chemistry type. A red OAT coolant from Toyota is not the same as a red HOAT coolant from Chrysler. When in doubt, drain the system completely and refill with OEM-specified coolant from the dealership, which eliminates compatibility risk entirely. OEM coolant typically costs $15 to $25 per gallon, and using the wrong type to save $10 is how people cause $800 in heater core damage.
Six Warning Signs Your Coolant Needs Attention Now
Coolant problems rarely announce themselves dramatically until they have already caused damage. These are the signals worth responding to before the temperature gauge tells you something has gone wrong.
1. Discolored or murky fluid in the reservoir. Fresh coolant is bright and transparent, whether green, orange, pink, or blue. Coolant that has turned brown, rust-colored, or cloudy is contaminated with corrosion products. This does not just mean the fluid is old. It means corrosion is actively occurring inside the cooling system, and the particles in the fluid are evidence of metal being removed from your radiator, heater core, or water pump housing. A brown reservoir is a flush-now situation, not a soon situation.
2. A sweet smell from the vents or under the hood. Coolant has a distinctive sweet odor. Smelling it inside the cabin means coolant is leaking into the heater core. Smelling it from under the hood means it is leaking externally from a hose, the radiator, or the reservoir. Either situation warrants immediate inspection.
3. The reservoir level keeps dropping without visible external leaks. If you top up the coolant reservoir and it drops again within a few hundred miles without any visible puddles under the car, the coolant is going somewhere it should not. The concerning destinations are an internal head gasket leak, where coolant enters the combustion chamber and exits as steam through the exhaust, or a leak into the engine oil. Either situation requires professional diagnosis before it becomes engine failure.
4. Weak heater performance in cold weather. A heater that fails to produce adequate heat, particularly on cold mornings, often points to coolant circulation issues. A partially blocked heater core, caused by sludge or corrosion deposits, reduces flow enough that the heat exchanger cannot warm the cabin adequately. This symptom frequently develops gradually rather than suddenly, which is why many owners attribute it to "the car just doesn't heat well" rather than recognizing it as a maintenance symptom.
5. Coolant pH below 7.0 on a test strip. Coolant pH test strips cost about $5 from any auto parts store and take ten seconds to use. Insert a strip into the coolant reservoir (on a cold engine), compare the color change to the scale on the packaging, and read the pH. Healthy coolant should test above 7.0. Coolant that reads below 7.0 has become acidic from depleted inhibitors and is actively corroding your cooling system components. This is the most objective early indicator that a flush is overdue.
6. Temperature gauge running higher than normal. If your temperature gauge typically sits in the middle third of its range and begins reading higher than usual, particularly in traffic or during sustained uphill driving, the cooling system is losing efficiency. Old coolant with reduced heat transfer capacity, partial blockage from corrosion deposits, or early water pump wear can all contribute to this. Address it before the gauge ever enters the danger zone.
When to Flush: Actual Intervals by Vehicle Type
| Vehicle Type / Coolant | Standard Interval | Severe Service |
|---|---|---|
| Pre-2000 vehicle (IAT/green) | 2 years or 30,000 miles | 2 years or 24,000 miles |
| Modern gasoline (OAT coolant) | 5 years or 100,000 miles | 3 years or 60,000 miles |
| Toyota / Lexus (SLLC pink) | 10 years or 100,000 miles | 5 years or 60,000 miles |
| European (HOAT/VW G12, G13) | 3-5 years or 50,000 miles | 3 years or 30,000 miles |
| High-performance / track use | 1-2 years regardless of mileage | Every season |
| Any vehicle, brown or murky fluid | Immediately | Immediately |
Severe service conditions that accelerate coolant degradation include frequent towing or hauling, regular operation in stop-and-go traffic in hot climates, use of the vehicle as a rideshare or delivery vehicle with higher-than-average daily mileage, and operation in areas with significant temperature extremes. If any of these apply, use the shorter end of the interval range.
Always check your owner's manual first. The interval listed there reflects the manufacturer's testing of the specific coolant chemistry in that engine under normal operating conditions. Following the owner's manual interval is the starting point; the pH test strip gives you an objective check on whether the fluid has degraded faster than the schedule anticipates.
How to Check Your Coolant Level and Condition
Checking your coolant takes two minutes on a cold engine and should happen whenever you check your oil, approximately every month or every 1,000 miles.
First, and this cannot be overstated: only check the cooling system on a cold engine. The cooling system operates under pressure at temperatures that will spray scalding fluid if you open the radiator cap or reservoir on a warm engine. Wait at least two hours after driving, or check it first thing in the morning before the car has been started. Touch the upper radiator hose before opening anything; if it feels warm at all, wait longer.
Locate the coolant reservoir. On most modern vehicles, this is a semi-transparent white or translucent plastic tank connected to the radiator by a small hose, typically labeled with a coolant or temperature symbol. You do not need to open the radiator cap on modern vehicles; the reservoir is the service point for checking and adding fluid.
Check the level against the MIN and MAX lines molded into the reservoir sides. The fluid should sit between these marks when cold. If it is below the MIN line, coolant needs to be added. If it keeps dropping below MIN after you top it up, something is consuming it and a leak investigation is necessary.
Look at the color. As described above, brown or murky fluid is a flush indicator regardless of mileage or time since the last service. Healthy fluid should be clear and bright in its original color with no suspended particles.
If you have test strips, dip one in according to the instructions and read the pH. Below 7.0 means the inhibitors are depleted. Some test strips also check freeze protection and concentration, which tells you if the 50/50 water-to-coolant ratio has drifted due to topping up with water rather than premixed coolant.
DIY Coolant Flush: Step-by-Step
A coolant flush is a task that most owners with basic mechanical comfort can handle at home. The main requirements are working on a cold engine, using the correct coolant type, and properly bleeding any air from the system after refilling. Budget 60 to 90 minutes for a complete job.
What you need: the correct coolant for your vehicle (check the owner's manual for type and capacity, typically 8 to 16 quarts for passenger cars), distilled water (never tap water, which contains minerals that deposit scale inside the cooling system), a drain pan with at least 3-gallon capacity, a funnel, basic hand tools for accessing the drain petcock if equipped, and optionally a cooling system flush product to run through the system before the final drain.
Step 1: Confirm the engine is cold. This is not optional. The cooling system is pressurized when warm. Serious burns from scalding coolant are a real risk if you open the system under pressure. Two hours minimum after the last drive.
Step 2: Locate and open the drain. Place your drain pan under the radiator. Most vehicles have a petcock drain valve at the bottom of the radiator; some require you to disconnect the lower radiator hose. Open the petcock counterclockwise or remove the hose clamp and pull the hose. Allow all coolant to drain completely, which takes three to five minutes. A petcock drain alone will not remove all the coolant. A significant amount remains in the engine block passages and heater core.
Step 3: Run a flush if the fluid is contaminated. Close the drain and add a cooling system flush product mixed with distilled water according to the product instructions. Install the radiator cap, start the engine with the heater set to maximum, and let it run for the time specified on the flush product packaging, typically ten minutes. This circulates the flush solution through the heater core and engine block passages. Turn off the engine, wait for the system to cool completely (at least two hours), then drain again.
Step 4: Prepare the new coolant mixture. Most vehicles specify a 50/50 mixture of coolant concentrate and distilled water, which provides freeze protection to approximately -34 degrees Fahrenheit and raises the boiling point to around 265 degrees. Pre-mixed coolant eliminates the need to measure, but concentrated coolant mixed with distilled water is more economical. Never use tap water; the mineral content causes scale deposits that reduce cooling efficiency over time.
Step 5: Refill the system. Close the drain petcock or reconnect the lower hose. Fill the radiator slowly through the radiator cap opening, allowing air to escape. Fill to just below the filler neck. Then fill the reservoir to the MAX line. Leave both caps off for now.
Step 6: Bleed the air. This step is where DIY coolant changes most commonly go wrong. Air trapped in the cooling system prevents proper circulation and can cause localized overheating even when the gauge reads normal. Start the engine with the heater on maximum temperature and fan on high. Leave the radiator cap off and watch the coolant level. As the thermostat opens (you will see the coolant level in the radiator drop and begin circulating), add coolant to maintain the level. Continue until you see coolant circulating steadily without bubbles. Replace the radiator cap and check the reservoir level. Top up to the MAX line.
Step 7: Test drive and check for leaks. Drive the vehicle on a short trip, including some highway speed to bring the engine to full operating temperature. Check your temperature gauge throughout. After returning, wait for the engine to cool and check the reservoir level again. A slight drop is normal as remaining air purges from the system. Add coolant to bring it back to MAX and inspect under the vehicle for any drips at connections you disturbed during the job.
Step 8: Dispose of old coolant correctly. Coolant is toxic to animals because of its sweet taste and should never be poured down drains or onto the ground. Most auto parts stores (AutoZone, O'Reilly, Advance Auto Parts) accept used coolant for recycling at no charge. Keep it in a sealed container during transport.
When to Pay a Shop and What to Expect
Some cooling system jobs belong at a professional shop regardless of your DIY comfort level. Vehicles that require vacuum filling rather than gravity bleeding, those with complex bleed procedures (certain BMW models require activating the electric coolant pump through a diagnostic tool), and any vehicle showing signs of a head gasket or water pump problem should go to a mechanic before a simple flush addresses the symptoms while missing the underlying cause.
A professional coolant flush at an independent shop typically costs $100 to $200 for most passenger vehicles. Dealerships tend to run $150 to $300. The price variation reflects labor time, the type and quantity of coolant required, and whether the shop performs a machine flush (which uses equipment to force fluid through the system more completely than a gravity drain) or a drain-and-refill.
A professional service should include more than just draining and refilling the fluid. A thorough shop inspection checks the hoses for cracks, soft spots, and swelling at the clamps; the radiator cap for proper pressure rating and sealing; the coolant concentration and pH of the fresh fill; and visible evidence of leaks at all connection points. If a shop performs a coolant flush and hands the car back in five minutes without inspecting the hoses, that is a sign of a rushed service rather than a thorough one.
Never open a radiator cap or coolant reservoir on a warm engine. The cooling system operates at 13 to 16 PSI of pressure when hot. Opening it while warm releases that pressure instantly, spraying boiling coolant. Always wait at least two hours after driving, or verify the upper radiator hose is cold to the touch before opening anything in the cooling system.
Real Cost Comparison: DIY vs Professional
| Service Option | Cost Range | Time Required | Best For |
|---|---|---|---|
| DIY drain-and-refill | $20 to $40 | 60 to 90 min | Scheduled maintenance on a well-maintained vehicle |
| DIY with flush product | $30 to $55 | 2.5 to 3 hrs | Slightly contaminated fluid, first service on unknown history |
| Independent shop, drain-and-fill | $100 to $150 | Drop off, 1 hr service | Owners without tools or time |
| Independent shop, machine flush | $150 to $250 | Drop off, 1.5 hr service | Heavily contaminated systems, older vehicles |
| Dealership flush | $200 to $350 | Drop off, varies | Vehicles under warranty, specialized coolant types |
The Four Most Common Coolant Mistakes
Mixing coolant types. Covered above but worth repeating because it causes real damage. Green into an orange-coolant system, or orange into a green-coolant system, does not just reduce effectiveness. It creates a chemical reaction that produces gel-like deposits that block the heater core and water pump passages. If you have inherited a vehicle and do not know its coolant history, drain the system completely and refill with the manufacturer-specified type from the owner's manual.
Using tap water instead of distilled water. Tap water contains dissolved minerals, most commonly calcium and magnesium, that deposit as scale on hot metal surfaces inside the cooling system. This scale acts as thermal insulation on the surfaces that need to transfer heat most efficiently. Over time, scale buildup reduces cooling efficiency and can eventually block coolant passages. Distilled water costs about $1 per gallon at any grocery store and eliminates this problem entirely.
Skipping the air bleed after refilling. Trapped air in the cooling system does not circulate, which means the sections of the system upstream of the air pocket do not receive coolant. This can cause localized overheating even when the temperature gauge reads normal, because the gauge sensor may be positioned downstream of the air pocket. Thorough air bleeding after every coolant service is not optional.
Treating a coolant flush as a fix for overheating. A coolant flush addresses degraded fluid and corrosion deposits in a system that is otherwise functioning. If the vehicle is actively overheating, the cause is usually mechanical: a failed water pump, stuck thermostat, cracked radiator, or head gasket problem. Replacing the coolant in an overheating vehicle provides fresh fluid for whatever is causing the overheating to continue damaging. Diagnose first, then flush.
Coolant in Hybrid and Electric Vehicles
Hybrid and electric vehicles use coolant for purposes that do not exist in conventional gasoline cars, and the service requirements differ enough that a separate note is useful for owners of those vehicles.
In hybrid vehicles, the cooling system typically has two separate circuits: the conventional engine cooling circuit and a secondary circuit that cools the hybrid battery pack and power electronics. These circuits may use different coolant types and have different service intervals. Honda's Accord Hybrid and CR-V Hybrid, for example, use Honda-specified coolant in both circuits, but the service intervals for each are listed separately in the owner's manual. Mixing up which circuit gets what coolant is a mistake that damages expensive components, so always check the owner's manual rather than assuming the same coolant goes everywhere.
In fully electric vehicles, there is no combustion engine to cool, but the battery thermal management system, electric motors, and power electronics all use liquid cooling circuits. EVs like the Chevrolet Equinox EV and Tesla Model Y use coolant specifically formulated for EV applications. In most cases, these systems do not require the same regular interval flushing that combustion engine cooling systems do, but they do require periodic level checks and eventual service. The Volkswagen ID.4's official maintenance schedule, for example, specifies checking coolant level and frost protection at regular intervals without prescribing a fixed-interval flush, which represents the typical EV approach. Follow the manufacturer's schedule specifically rather than applying combustion-engine coolant service schedules to an electric vehicle.
If a warning light related to battery temperature, motor temperature, or thermal management appears in an EV, treat it as a high-priority service issue rather than something to monitor. Thermal management failures in EVs can damage battery packs that cost several thousand dollars to replace. A coolant level low warning in an EV is not the same as a low washer fluid reminder.
The Bottom Line on Coolant Maintenance
Coolant is the maintenance item that fits neatly into the category of things drivers never think about until something expensive breaks. A fresh fill of the correct coolant on the correct schedule costs under $50 in parts and an hour of your time. A heater core replacement costs $500 to $1,500 in labor alone, plus parts. A water pump failure on many modern vehicles requires removing the timing belt or chain cover, pushing the repair cost well past $1,000. A head gasket failure on a modern aluminum engine starts at $1,500 and frequently runs higher.
The cooling system is one of the few parts of your vehicle where preventive maintenance has a clear, demonstrable, heavily-documented track record of preventing expensive component failures. Check the reservoir monthly. Test the pH annually. Flush on your manufacturer's schedule. These are small habits that protect large investments.